Last year around this time, I submitted my application to the Canada Working Holiday Visa pool system for the first time. Unfortunately, throughout all of 2019, I didn’t receive any notification of being selected. I remember having two friends who also submitted their applications for the first time and were both selected right away in January. One of them gave up their spot, while the other proceeded with the application as planned. At the time, I couldn’t help but feel envious.
This year, I decided to try again. While I was back in Taiwan for the Lunar New Year holiday, I unexpectedly received an email on the morning of January 27th notifying me that I had been selected. My feelings were mixed. On one hand, I was thrilled to have finally been chosen for Canada! This meant I could fulfill my dream of participating in the Working Holiday program before turning 35. On the other hand, I felt anxious because the application process for the Canada Working Holiday Visa is incredibly complex, with numerous document requirements.
Since I was working in Shenzhen at the time, preparing the necessary documents within the deadline was particularly challenging. However, I managed to tackle everything step by step. Let me share a straightforward summary of how I navigated the application process!
Receiving the IEC Visa Application Notification
After submitting your profile to the pool, any updates regarding your application will be sent to your email as notifications. Therefore, it’s crucial to provide a correct and active email address when entering the pool to ensure you don’t miss any important results or application updates.
It’s worth noting that some applicants miss out because they don’t regularly check their email. By the time they notice the notification, the 10-day acceptance period for the visa application may have already expired, causing them to lose their eligibility to proceed. In such cases, they would have to wait until the following year to try again.
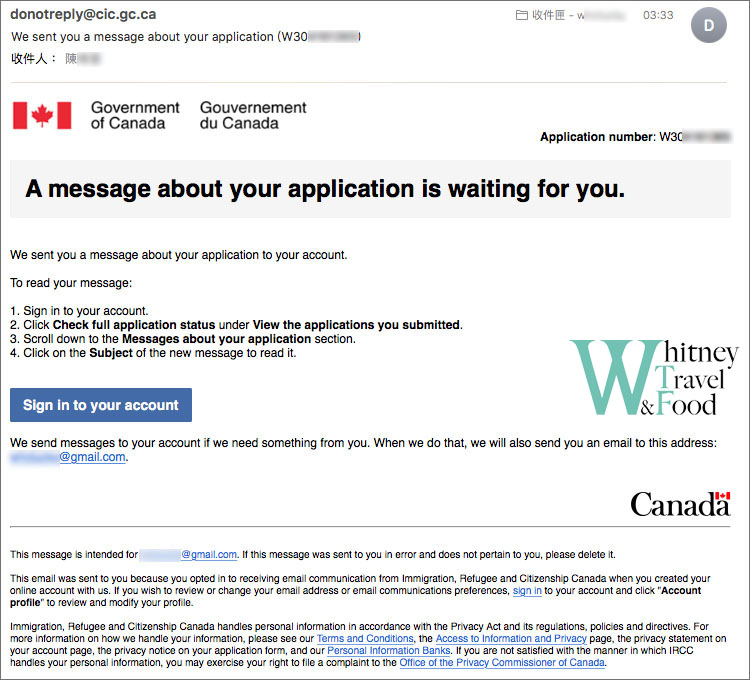
This is the email I received from IRCC. It states that there is a new message regarding my application and instructs me to log in to the website to check it.
Typically, you receive this type of notification When the monthly draw pool has closed, You’ve been selected in the draw or There are issues or updates related to your application. Otherwise, you generally wouldn’t receive such an email. Regardless of the reason, if you receive this notification, you must sign in to the IRCC website to check it.
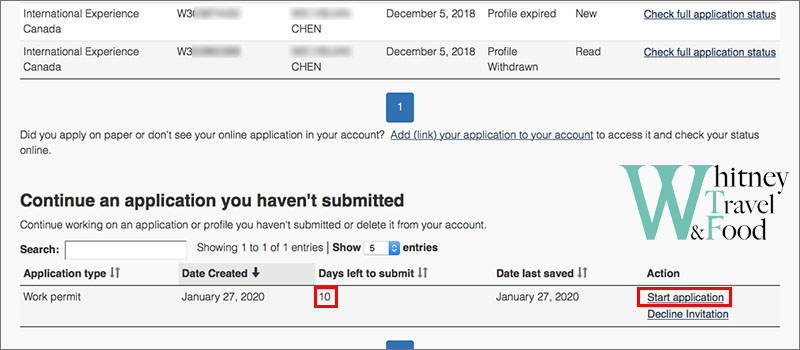
Once you log in to the IRCC website and see the screen above, it means: Congratulations, you’ve been selected~~~
The red box on the left shows the 10-day hesitation period. If you don’t click on Start Application within this 10-day window, the opportunity will be given to someone else. 😉
If, after being selected, you need to decline the visa application due to career planning or other personal reasons, you can click on Decline invitation to forfeit your application.

After clicking Start application, you will see that the red box shows “20”, which means you have only 20 days to complete the application form, upload documents, and pay the visa fee. Be sure to make the most of this time!
If the required documents are complicated, it’s recommended to start preparing during the 10-day hesitation period. This way, you’ll have at least 30 days to gather and prepare all the necessary documents for the application.
How to Fill Out the IEC Application Form
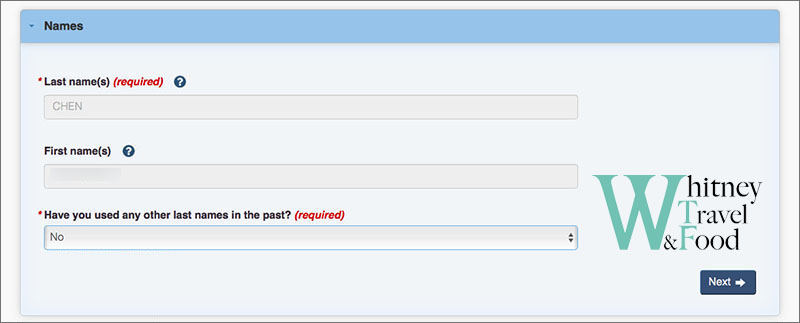
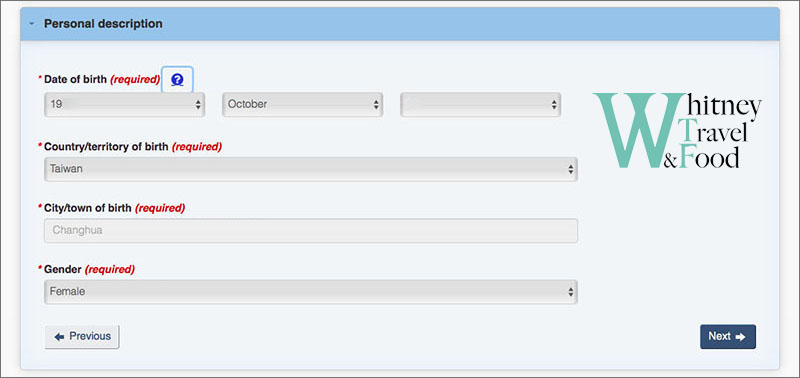
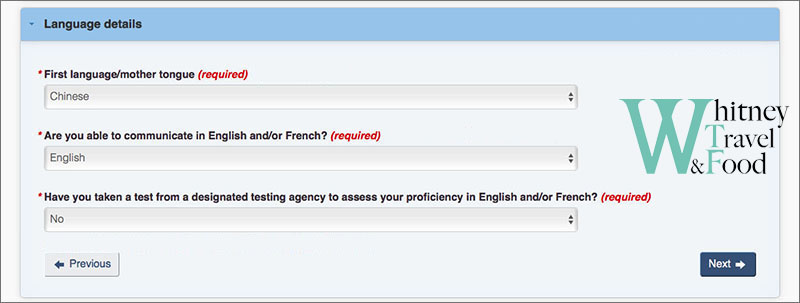
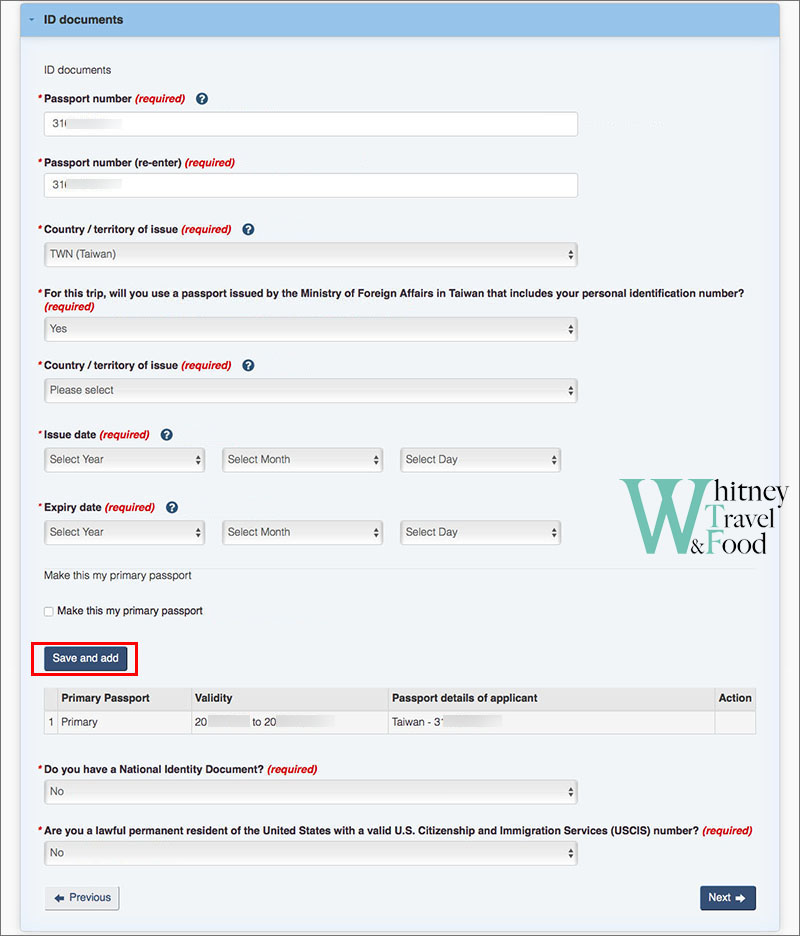
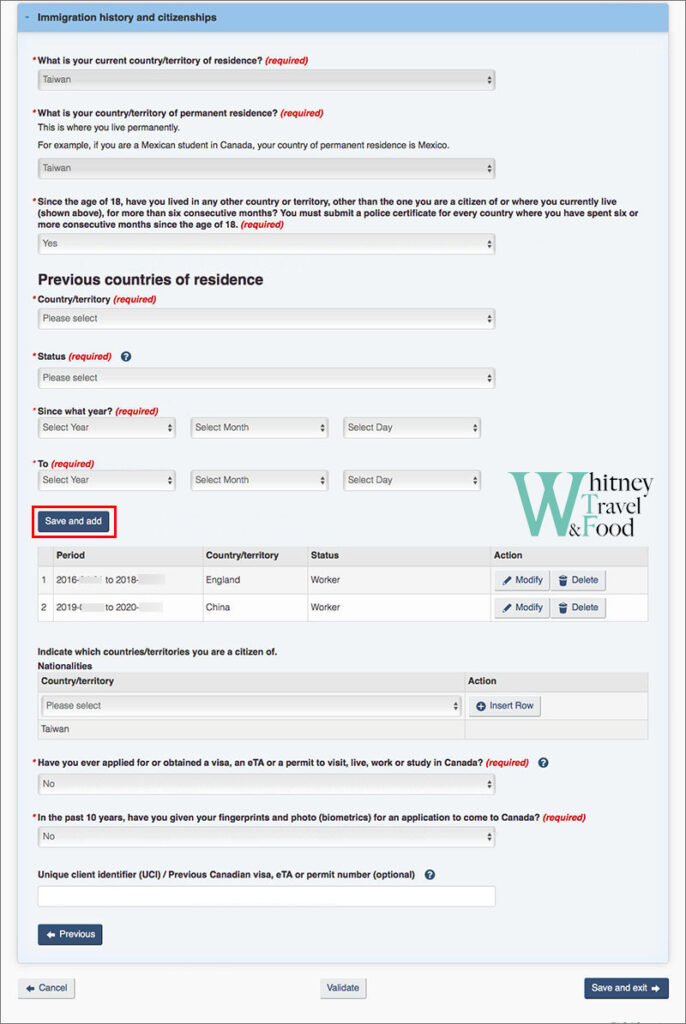
The visa application form is divided into four main sections: Personal details of applicant, Contact Information, Work and education details, and Application details. If you haven’t completed it yet, the status will show as “in progress.” You can click the “Continue form” button on the right to start filling out the information one by one. The process is not difficult; just fill in the information according to your actual situation.

Personal details of applicant
This section is mainly for entering your personal information, etc. Please fill it out according to your own situation.

Contact Information
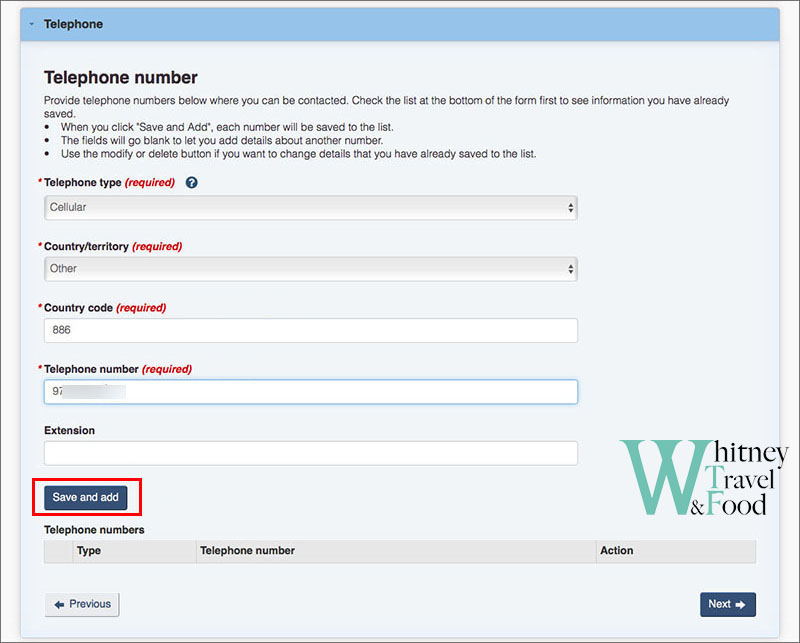
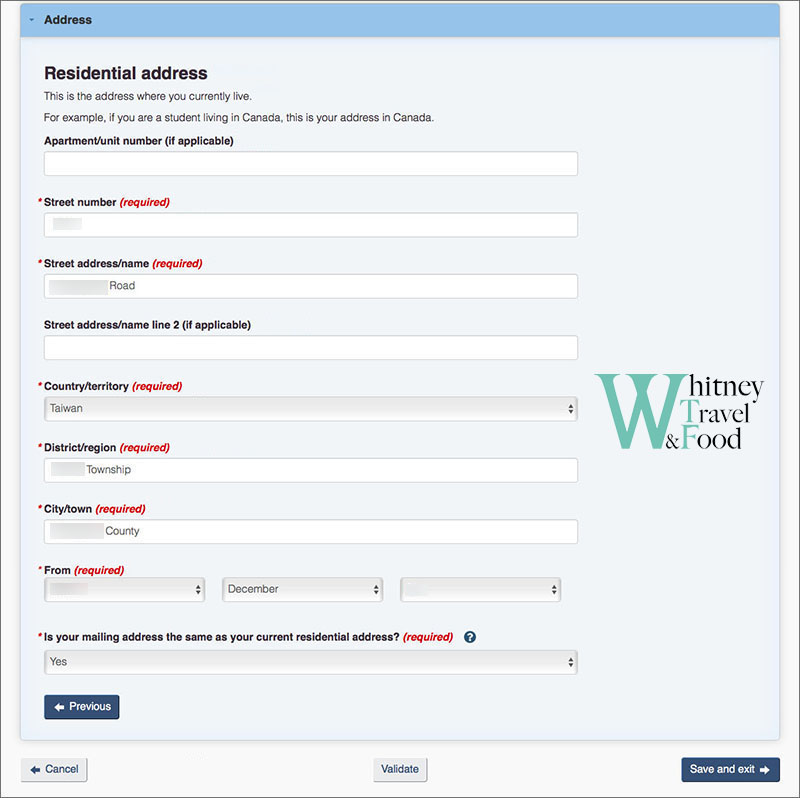
This section is for entering your personal contact information, such as email, phone number, and address, etc.


Work and education details
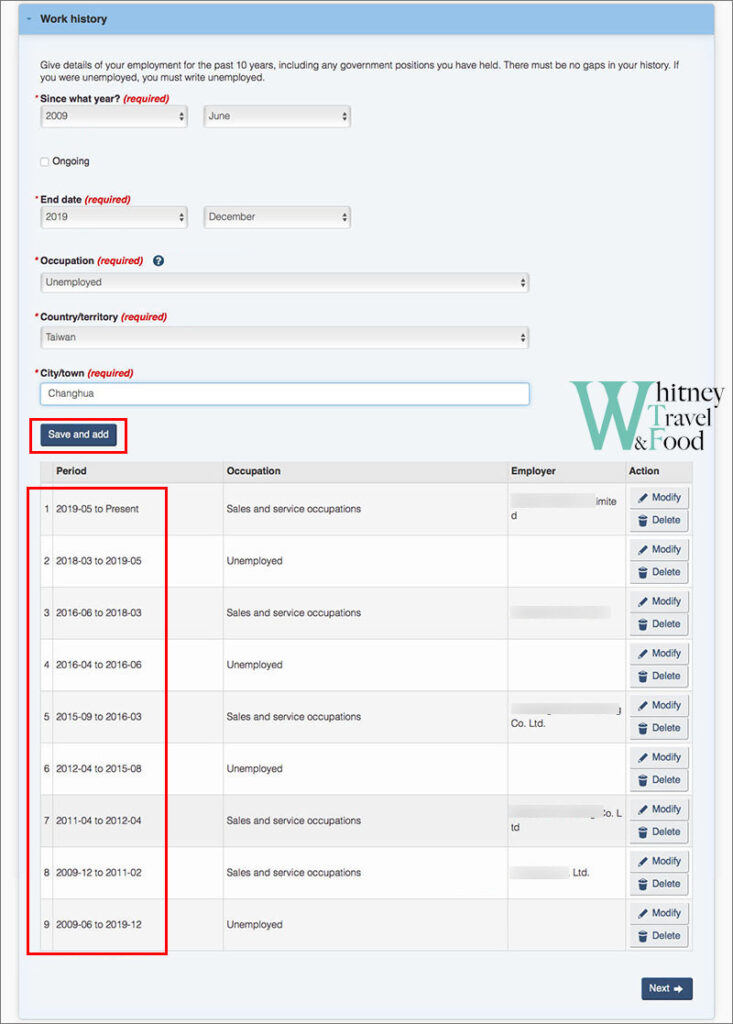
This section may be a bit more challenging. In the “Work History” section, you need to provide all your work experience from the past 10 years, with no gaps in the dates. Make sure to fill out the entire section. If you were unemployed during a period, write “unemployed”.
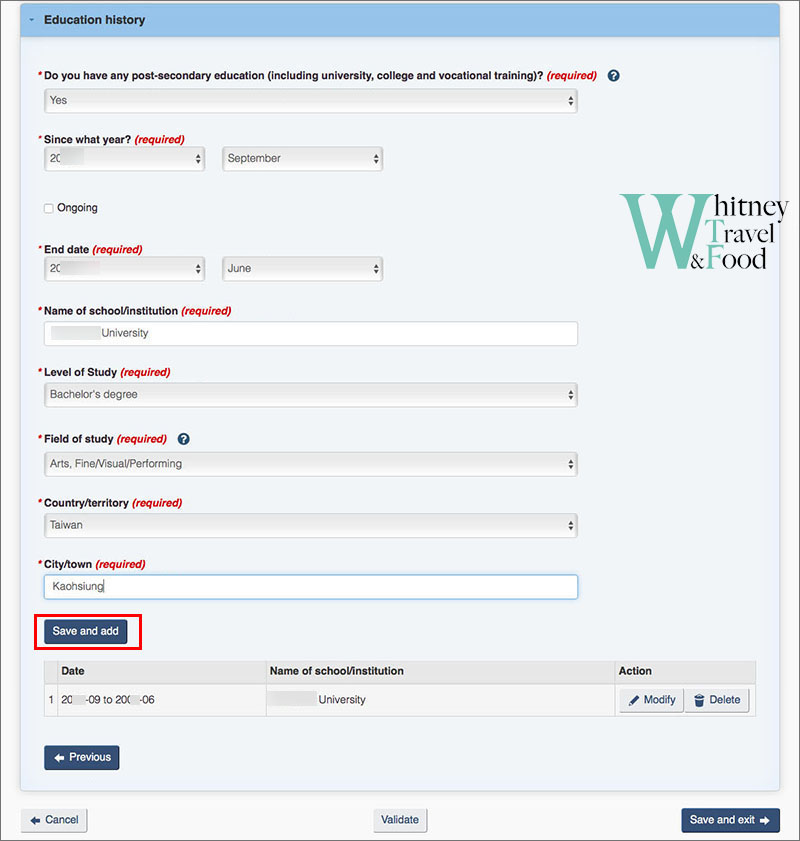
In the “Education History” section, you need to list your education starting from high school up to your most recent qualification.
Application details
The last section asks for some additional information. Please fill it out according to your personal situation.

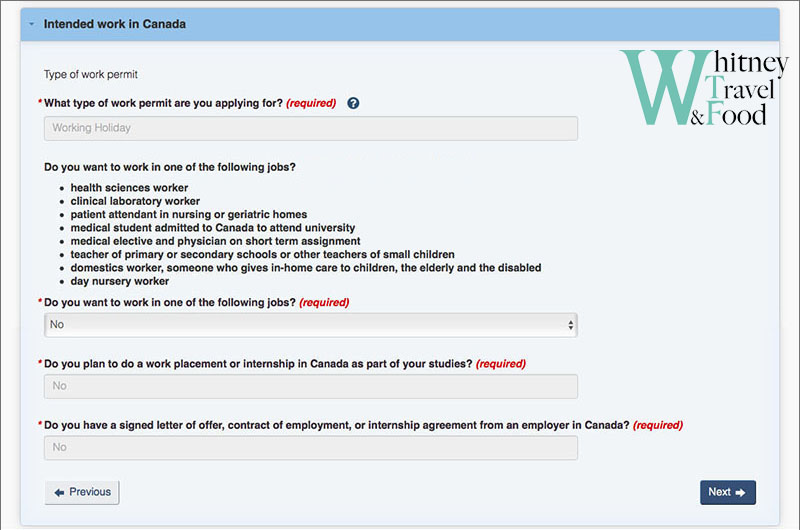
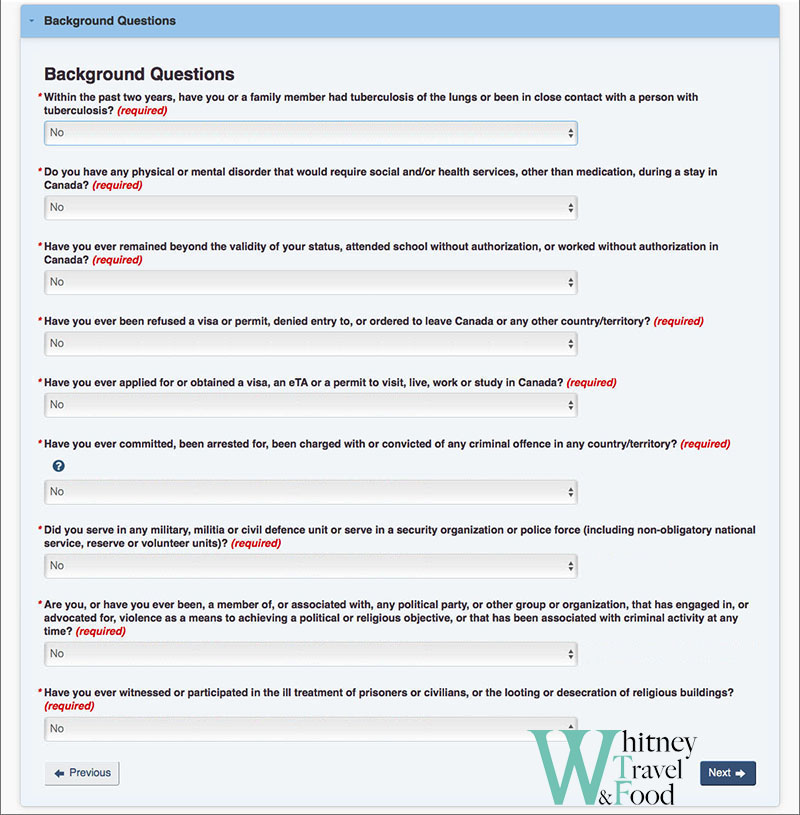
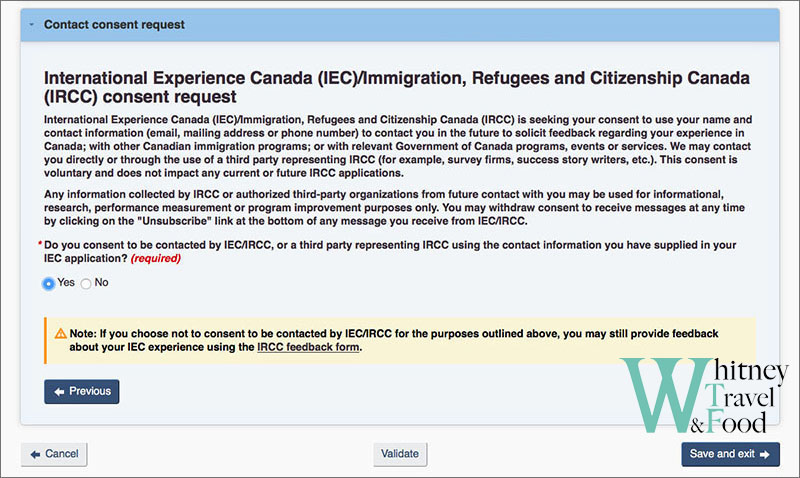
It took me 2-3 hours, but I finally completed all the application forms. After finishing, I saw the following screen:

All statuses show as “Complete”. If you need to make any changes, you can click Update form to modify it. If everything is correct, click “Continue” at the bottom right to proceed to the next page for document uploads.
Required Documents Preparation for Upload
After entering the page, you will see a list of documents waiting to be uploaded. When uploading documents, make sure the file names are in English, or the upload will fail. Also, the file size must not exceed 4MB.
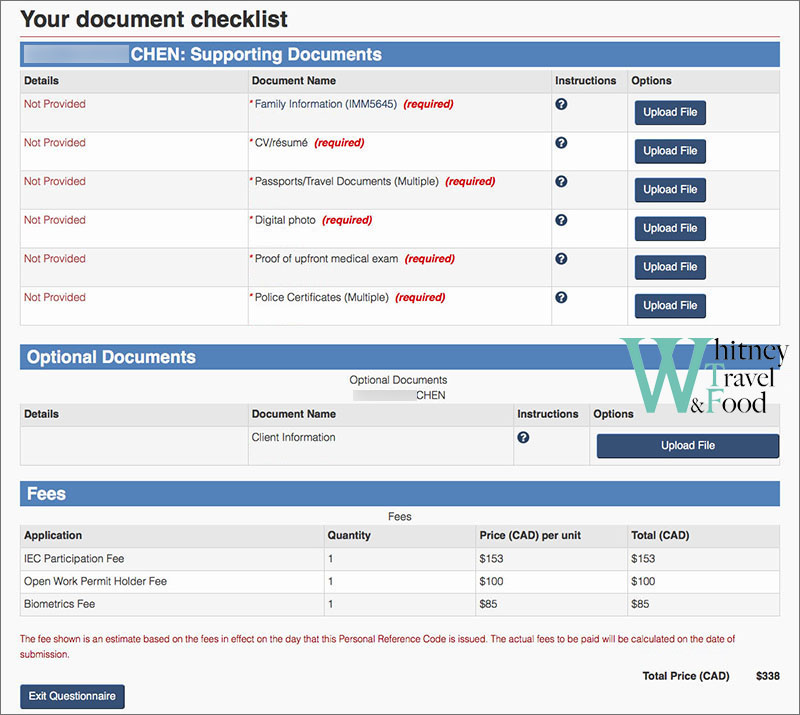
The application documents for working holiday in Canada can be quite complex and troublesome, requiring patience to prepare each one. For the document preparation process, you can refer to the following:
Family Information(IMM5645)
Click on Family Information (IMM5645) to download the PDF form for completion. If the file cannot be opened or shows an error, please visit the Adobe website to download Adobe Acrobat Reader DC, which will allow you to open the file properly.
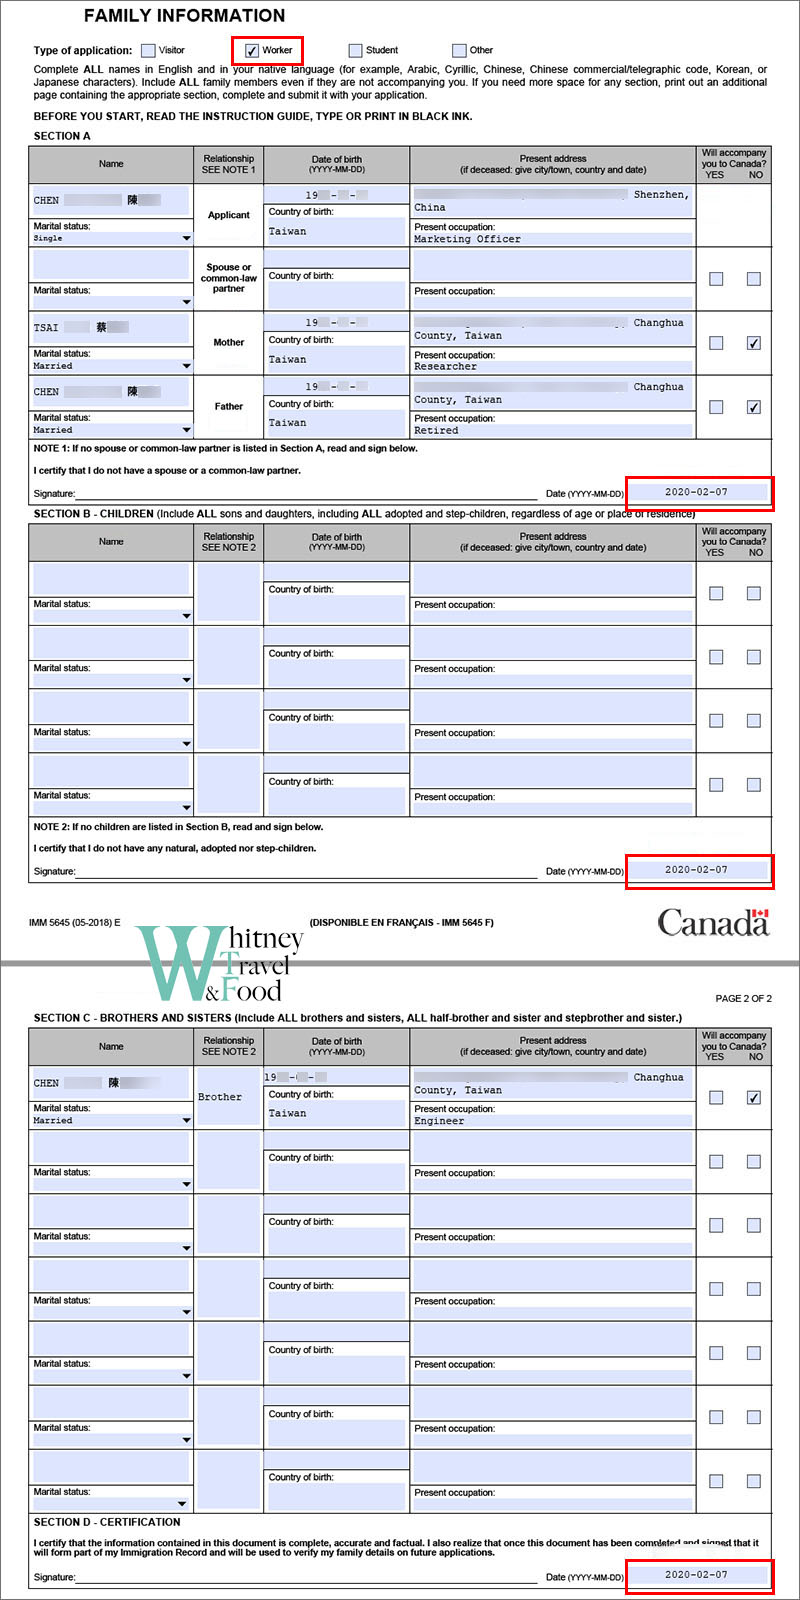
Fill it out truthfully. Remember to fill in the date at the bottom of each section. This form is not too difficult, and once completed, you can upload it directly.
CV/résumé
Write a simple resume in English, including your education, work experience, and a brief self-introduction. There are many tutorials online, and it’s recommended to keep it to one page.
Once you’ve completed your resume in Word, convert it to PDF and upload it.
Passport/Travel Documents
Scan the entire passport, including the page with the passport photo and personal information, as well as any pages with stamps or marks. Make sure to scan them clearly and convert the scanned pages into a PDF file for upload. The scanned pages must be clear and legible.
Digital Photo
Upload a digital photo, with a minimum resolution of 420 x 540 pixels and 600 dpi, and a file size of at least 100 KB. The photo must be clear and recent.
You can go to a photo studio and tell the photographer you need a passport photo. Afterward, ensure you receive the digital file of the photo, and then simply upload it.

Proof of Upfront Medical Exam
About proof of upfront medical exam, please refer Working Holiday in Canada (4) Proof of Upfront Medical Exam.
Police Certificates
Aside from the police certificate from your place of residence, if you’ve stayed in another country for more than 6 months, you are also required to provide that country’s police certificate. Unfortunately, I’ve worked in Ireland, the UK, and am currently working in Shenzhen, China, so I had to apply for several police certificates. Below is the process I followed to apply for them, which may be helpful for others to reference.
Pay for fees
After all the necessary documents have been successfully submitted and uploaded, the “Next” button will appear at the bottom left, indicating that it’s time to proceed to the next step, which is the payment process.
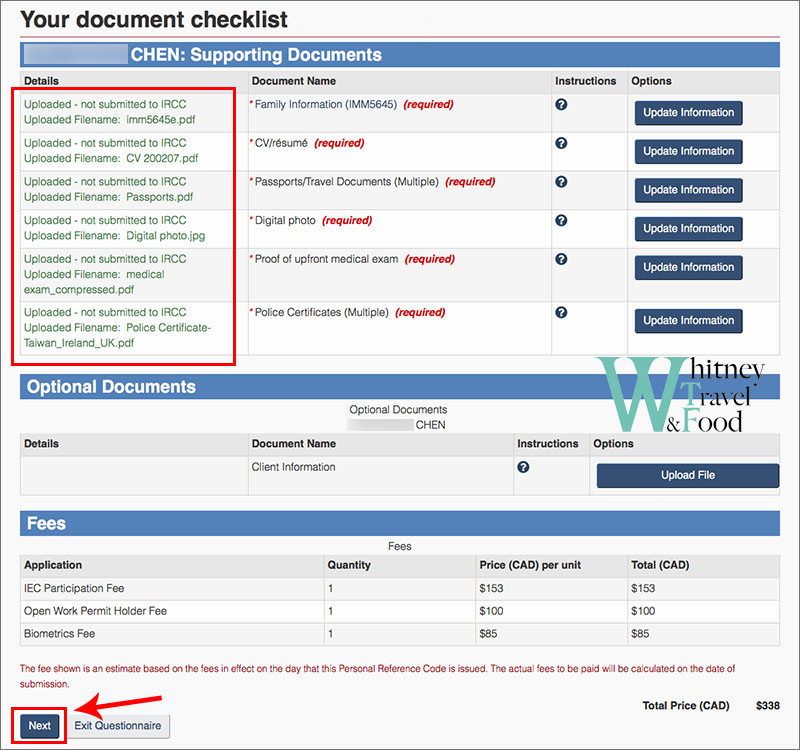
IEC Participation Fee is CA$153, Open Work Permit Holder Fee is CA$100, Biometrics Fee is CA$85, please have your credit card ready and ensure that there is a balance of at least CA$338 available on the card.😶
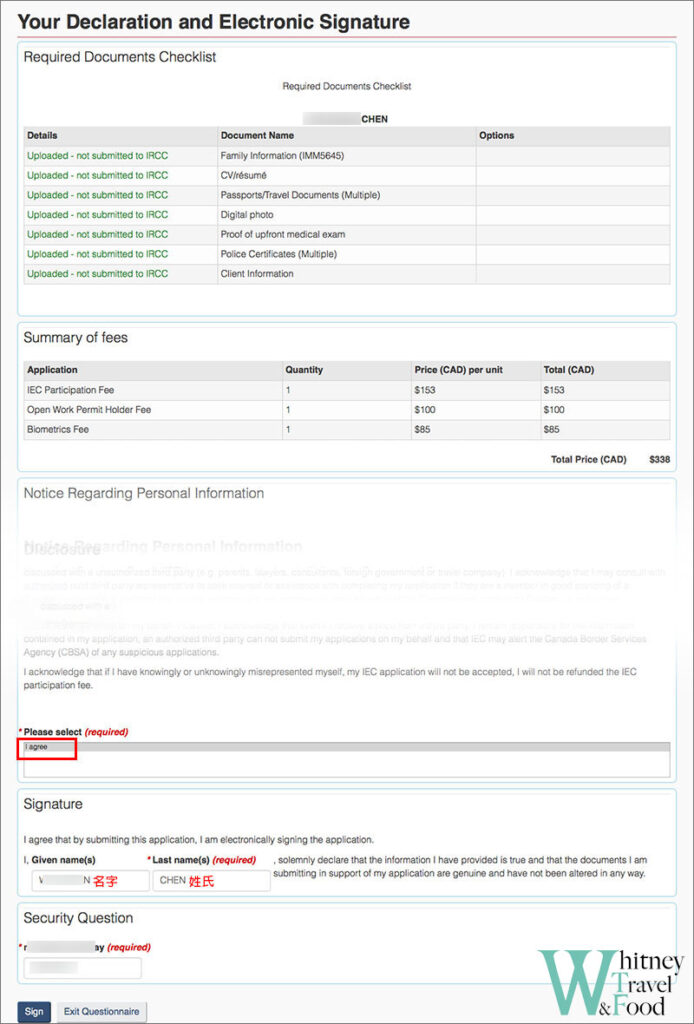
Next, you will proceed to sign the declaration document and upload all the required documents to IRCC.
Remember to select I agree and pay attention to ensure that your name is entered correctly. It’s a good idea to double-check to make sure your surname and given name are in the right order. Lastly, input the security question and click Sign to complete the process.
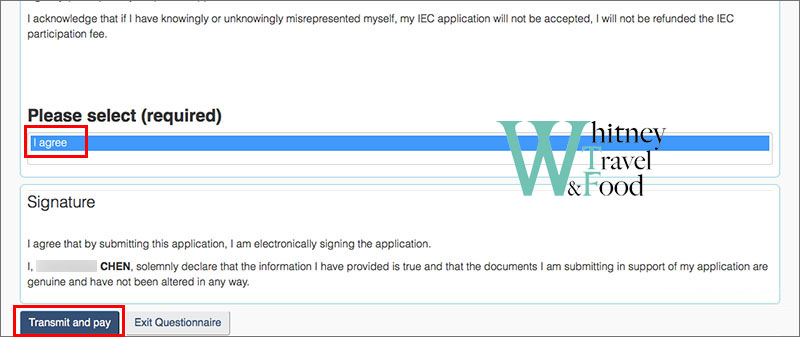
On the next page, you will review everything again. Make sure to select I agree and double-check that your name is correct. After that, click Transmit and pay to proceed with the payment.
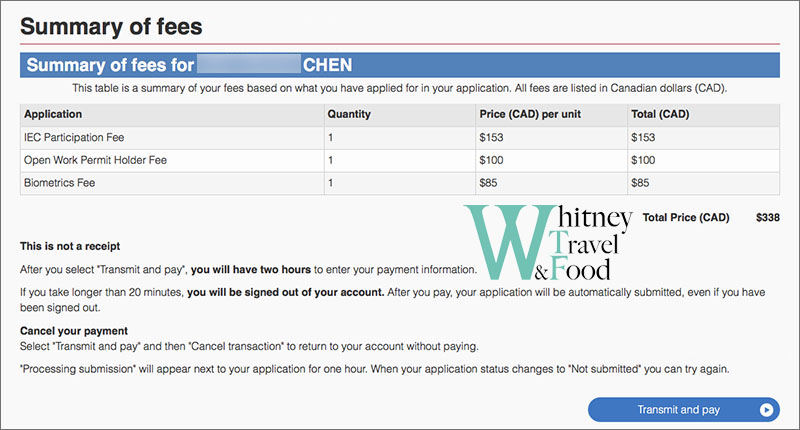
After reviewing everything on the next page, make sure to select I agree and double-check that your name is entered correctly. Once confirmed, click Transmit and pay to proceed with the payment.
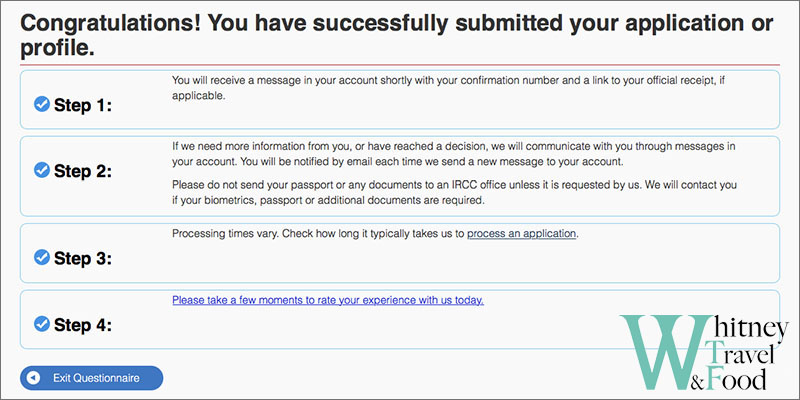
Once you see this page, it means the payment was successful!
This also indicates that the second stage of the visa process has been temporarily completed. The next step is to wait for the biometrics request, which typically arrives within 24 hours. If any additional documents or medical re-examinations are required, they must be completed as well. Once everything is submitted, a decision will be made regarding the issuance of the POE (Port of Entry).
Related Posts
-
Working Holiday in Canada (1) Eligibility & How to Apply -
Working Holiday in Canada (2) How to fill out the IEC form application -
Working Holiday in Canada (3) Collect Biometrics in Canadian Visa Application Center in China -
Working Holiday in Canada (4) Proof of Upfront Medical Exam -
Working Holiday in Canada (5) Arrive Canada and Collect Open Work Permit -
How to Apply Study Permit in Canada before Working Holiday Visa expires? -
How to Exchange Driver License Address BC in Canada as a Reciprocal License Holder? -
Apply for Evo Car Share with Non-BC Driver’s License in Vancouver -
How to Apply for MSP in Vancouver BC and Pay for MSP Fees? -
How to Apply for PR as a Common-Law Spouse in Canada -
Working in Canada: How to Apply for a Social Insurance Number (SIN) & File Your First Tax Return with the CRA
Thank you for reading!
If you like my post🖋️
Feel free to buy me a coffee☕️
Your support is our motivation for creating!🥰


